Introduction
I decided to try my hand at clock-making a few years ago, not realizing quite how much time would be involved in acquiring and building a suitable set of tools before I got anywhere near to making any clock parts. Since then, it has seemed to me that the vast majority of the time spent in my engineering activities has involved building tools or jigs of various kinds, in order to build up the set of equipment that I need to achieve the original end - building a clock. Needless to say, it was about 7 years on before I started to build my first clock, and it will probably be another year before I complete it. On the other hand, as I'm sure others have found in the past, building such tools can be just as satisfying an exercise as using them to complete the original project that necessitated building them in the first place. This article is the result of one such exercise, and one that has resulted in a very useful and versatile piece of equipment.
Previous dabbling had taught me the essentials of cutting and shaping metals using hand tools, but as I had no real experience of machining metal, and in particular, metal turning, the first essential purchase was a small lathe. After much poring over books on clockmaking techniques and equipment, I chose to buy the Peatol Micro Lathe (manufactured in the USA as the Taig lathe); this is a simple and inexpensive 2.25" centre height, non-screwcutting lathe with a good range of accessories, including steadies, a vertical slide and compound top slide. It comes as a partially assembled kit of parts, so the first exercise for the eager novice metal-turner is to assemble it, and in particular, to work out how to mount the various components on the base plate in a manner that will result in a usable machine...but I digress. The only real drawback with the Peatol/Taig lathe is the absence of screwcutting facilities, which limited my options for some of the aspects of the dividing head design. (Follow this link to see my leadscrew design, developed some while after the Mk 1 dividing head, based on adapting some of the parts from the Sherline lathes for this purpose.)
From my reading into the subject of clockmaking, I had released that gear cutting (or wheel cutting, as it is known in the clockmaking literature) capability was likely to be significant if I was to stand any chance of building a clock, so my first problem was to decide on a gearcutting method. A dedicated wheelcutting engine is often used by clockmakers, but I discarded that approach on the grounds that such a device would probably be of little use for any other purpose. The alternative of using a dividing head in conjunction with the lathe had the advantage that it would be useful for many other machining operations as well as for wheelcutting, and I could always add the convenience of a dedicated machine later on. Hence the subject of this article; as there is no dividing head in the Peatol/Taig range of accessories, and all other designs that I had come across were too large to be conveniently used on a lathe of this size, I decided that I would design and build one myself. The usual comments apply, that although the design described was developed for the Peatol/Taig lathe, it could no doubt be adapted for use on other small lathes if so desired. Similarly, in many cases the choice of materials described here reflects what I had to hand at the time I built the prototype; no doubt some readers will choose to adapt the design to suit the stock they have available.
Since producing this "Mk I" dividing head, I have developed a more comprehensive dividing solution for the Taig (Peatol) lathe and mill; however, as this original design is somewhat simpler to construct, it may have merit for some readers.
There are two major options for a gearcutting set-up in the lathe. The first is to use the dividing head, or even just a simple dividing plate, to position the lathe spindle. The spindle in turn holds the wheel blank. A second driven spindle (a milling attachment, perhaps) drives the gear cutter.
The second option is to use the lathe spindle to drive the gear cutter and use the dividing head, mounted on the lathe's vertical slide with its output shaft vertical, to hold the wheel blank. As I was not in possession of a separate spindle to drive a cutter, this design was developed with this second configuration in mind. However, with the use of a suitable adapter plate and split collet to attach the head to the lathe headstock and drive spindle, it should be possible to use the head in either configuration.
The Taig lathe has a T-slotted cross slide and vertical slide, both 2" wide by 3" long, with 2 T-slots running lengthways " in from each edge. Thus a dividing head that is designed to be mounted on the vertical slide can equally well be mounted on the cross slide. In the latter case, there is an advantage in allowing the dividing head to be mounted with its axis at lathe centre height, as this makes it possible to use the head to drill radial holes in a workpiece. This also requires that the mounting arrangements allow the dividing head to be mounted with its spindle axis at right angles to the lathe spindle.
A major consideration was provision of a chuck for work-holding. At around the time I started thinking about this project, I had taken delivery of a Jacobs chuck which came with a "free" 1MT arbor. With no facilities on the Taig for the use of 1MT tooling, the arbor was a redundant item, but it lead to the idea of using Jacobs chucks as the primary work-holding device for the dividing head. The prototype dividing head was built using this 1MT arbor, somewhat modified as described below, as its output shaft. When set up between centers in the lathe, using a live centre in the tailstock, it was straightforward to turn down the 1MT taper to a more appropriate profile. Needless to say, the arbor was not of the hardened variety!
The construction of the main body of the dividing head needed to be simple, not least because of my as yet limited skills with using the tools of the trade. Castings of any kind were ruled out on grounds of difficulty and expense should the design change as I built it. I had no technical drawing capability at the time, and so I intended to build the prototype without any formal design, largely as an exercise in familiarization with machining techniques in the lathe, so design changes en route seemed highly likely! (Since then I have acquired a CAD package, AutoSketch for Windows, which I would highly recommend to anyone who has a suitable PC and who doesn't want to learn technical drawing the hard way. The drawings in this article were all generated using AutoSketch.) In keeping with the general style of the Taig, which makes considerable and ingenious use of aluminium extrusions in its construction, I chose aluminium angle and square sections as the basic constructional material for the frame of the dividing head and its fittings.
There seemed to be a considerable advantage to be gained by following normal practice and employing a worm drive in the design of the head. The reduction ratio of the drive would in itself offer some useful division possibilities, in addition to those available by use of the division plates.
A dividing head generally consists of a 40:1 or 60:1 worm drive, with the input shaft driving the worm, and the worm wheel driving the output shaft. The output shaft is fitted with some suitable work-holding device to mount the item to be machined; the input shaft is fitted with an indexing arm, the position of which is measured either against a protractor or against a division plate (a disc with circles of evenly spaced holes drilled in it). Rotating the input shaft by a known number of degrees rotates the output shaft by a smaller amount, in the ratio of the worm drive. For example, if the drive ratio is 40:1, half a turn (180 degrees) of the input shaft rotates the output shaft by 4.5 degrees. Alternatively, rotating the indexing arm by one hole position in a 36-hole circle (i.e. by 10 degrees) rotates the output shaft by exactly 0.25 of a degree. A useful consequence of the use of such a reduction drive is that it improves the accuracy with which the output shaft is positioned, in the ratio of the drive. In the above examples an error of one degree in the positioning of the input shaft results in an error in the position of the output shaft of only one fortieth of a degree.
If you wish to divide a circle into a given number of equal divisions, the number of rotations (or fractional rotations) of the input shaft necessary to produce a movement of one division in the output shaft is given by dividing the drive ratio by the number of divisions required. For example, with a 40:1 ratio, if you wish to cut a gear with 50 teeth, the input shaft must be rotated by forty 50ths of a turn between each cut. This is where the numbered circles of holes on the input shaft come into play. The desired result is achieved by moving the indexing arm 40 hole positions on a 50 hole circle between each cut. (The same result can, of course, be achieved by, say, 16 holes in a 20 hole circle, or 4 holes in a 5 hole circle,... etc.)
My apologies to those readers for whom the above has been a lesson in egg-sucking, but the point of all this is that it will be necessary later on to use the partially built dividing head to mark out its own protractor and drill its own division plates. A little thought up front as to how this would work told me that, once I had made an accurate protractor, I could produce reasonably accurate division plates simply by calculating the required rotation of the input shaft in degrees. I concluded that it should be possible to place the input shaft for each division to better than a degree either way, so the error in the output shaft position would be very small. In use, any error in the drilling of the division plates would again be reduced by the drive ratio, so if the first set of division plates were not accurate enough, I could always cut a second set of plates from the first which would be further improved in accuracy. If necessary, this process could be repeated until no improvement could be gained over the inherent inaccuracies in the dividing head and the drilling setup. In order to follow this constructional route, I therefore needed to choose a drive ratio that would allow me to make a protractor using only the division capabilities provided by the drive ratio itself.
With a 60:1 worm drive, a 6-hole circle would be all that I would require in order to use the dividing head to mark out a protractor (6 times 60 being 360, so rotating the input shaft by one hole in the 6-hole circle gives one degree rotation of the output shaft). A 6-hole circle would be very easy to derive from a 60:1 ratio on the partially completed dividing head. One would simply mount a suitable blank on the output shaft, mount the dividing head on the cross-slide and use the lathe as a drilling machine; ten full turns of the input shaft after drilling each hole rotates the output shaft by one sixth of a turn.
With a 40:1 ratio, a 9-hole circle would be needed. As there is no simple way of generating this from the 40:1 ratio, this was option was rapidly discarded.
A 30:1 drive plus a 12-hole circle would be a suitable, if unconventional, alternative to the 60:1 ratio; cutting the 12-hole circle requires 2.5 turns of the input shaft per division. For the purists amongst us, a two-hole circle could be cut first, to ensure accurate positioning for the half-turns, but this really is unnecessary given the advantage in accuracy that is gained from the worm drive. In practice, I found that judging half-turn positioning by eye, by lining up the indexing arm against a handy vertical, was quite satisfactory for this operation.
30:1 was the final choice of drive ratio, partly as it promised to halve the number of turns of the input shaft when in operation (and hence offer a reduction in operator fatigue) and partly because a browse of the HPC Gears catalogue showed that there was a 30:1 worm drive in their 32DP range that seemed "about right" size wise for the project.
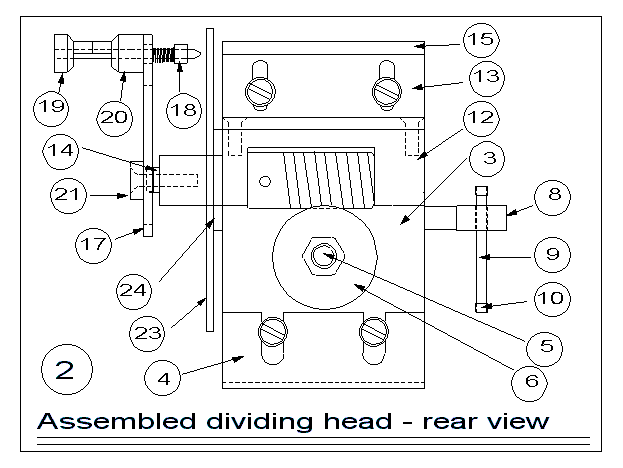
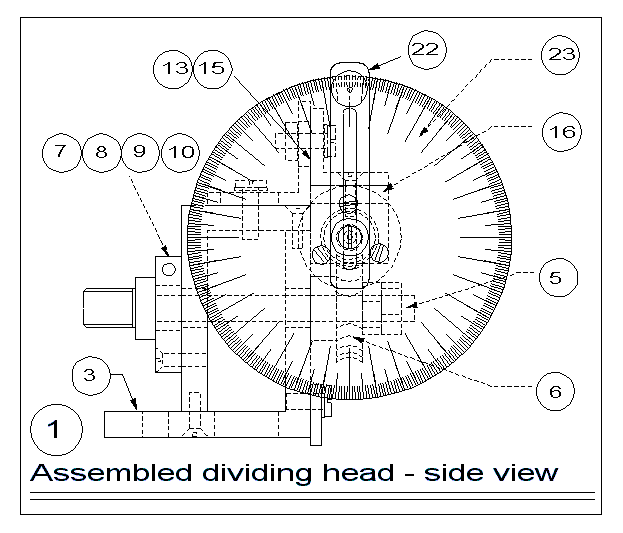
Figure 1 shows a side view of the assembled dividing head, Figure 2 shows a rear view. The main components are:
- A main frame, fabricated from Aluminium angle. One piece forms the base-plate (with holes for T-bolts) and the back plate; the other forms the top plate and front plate. The output shaft runs in bearings in the front and back plates.
- The output shaft and wormwheel.
- A brake assembly, to lock the output shaft.
- A worm carrier, fabricated from " square Aluminium bar, mounted on the main frame by means of adjustable brackets fabricated from Aluminium angle. This adjustment allows correct positioning of the worm for minimum backlash, but could also be used to accommodate alternative wormwheel sizes if so desired.
- The indexing arm/detent assembly, mounted on the input shaft.
- The protractor/division plate and carrier, mounted on the worm carrier.
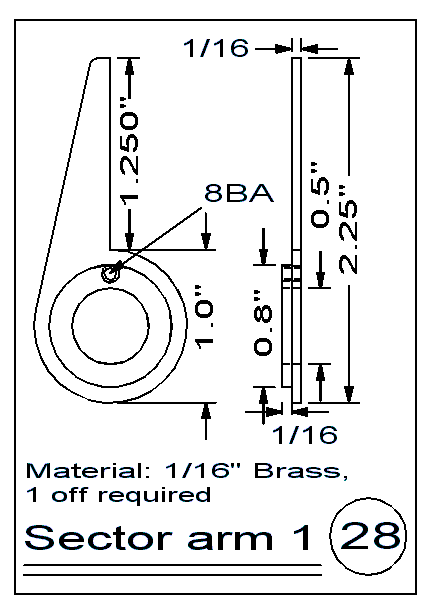
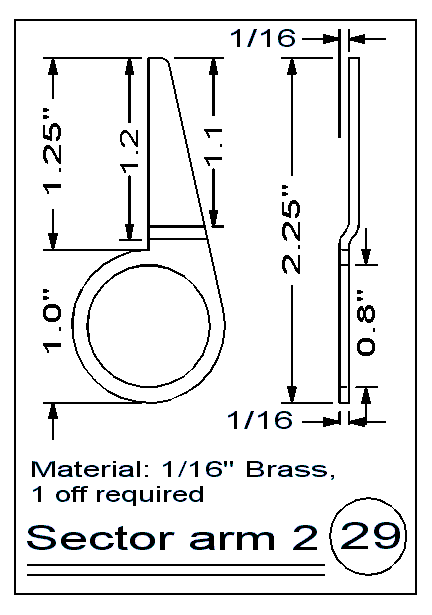
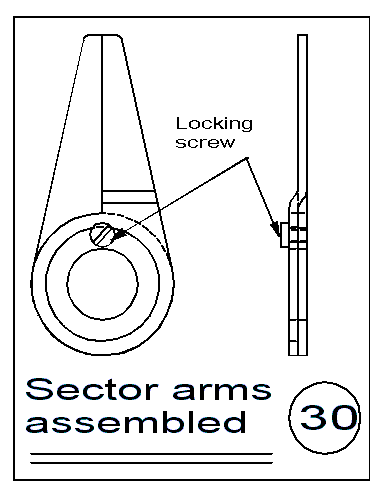
- A pair of sector arms, to simplify the otherwise hazardous process of counting holes in division plates.
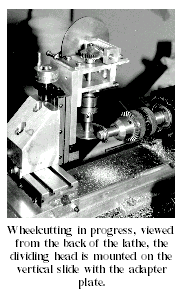
- An adapter plate, for added height when the dividing head is mounted on the vertical slide for wheelcutting or radial drilling operations.
A suitable construction sequence follows.
A final section of the article discusses some more major improvements that could be made to the design of the head, which the more adventurous reader may choose to experiment with. These are in the pipeline for a Mark 2 version of the head, which may form the basis of a future article once I have finished working out the constructional details. For Mark 2 I may even try a really radical approach and design it before I start the machining!
The frame is constructed from two pieces of 2" X 2" X " Aluminium angle as, as shown in Figure 3.Cut the lengths slightly oversize; do not finish to their final 2" length yet. Cut off the excess " strip from the piece that will form the front/top plate; with careful cutting the scrap will be usable for the brake assembly. Mark out, drill 4BA clearance and countersink the top and bottom plates for the six 4BA screws that will hold the two halves of the frame together. The countersinking must be deep enough for the screw heads to be sunk just below the surface. Clamp the two frame halves together in their assembled configuration. Spot through the holes to mark the positions of the holes in the ends of the front and back plates, drill and tap them 4BA. Assemble the frame using " long countersunk steel screws. Finish the cut end of the top plate so that it is flush with the back plate.
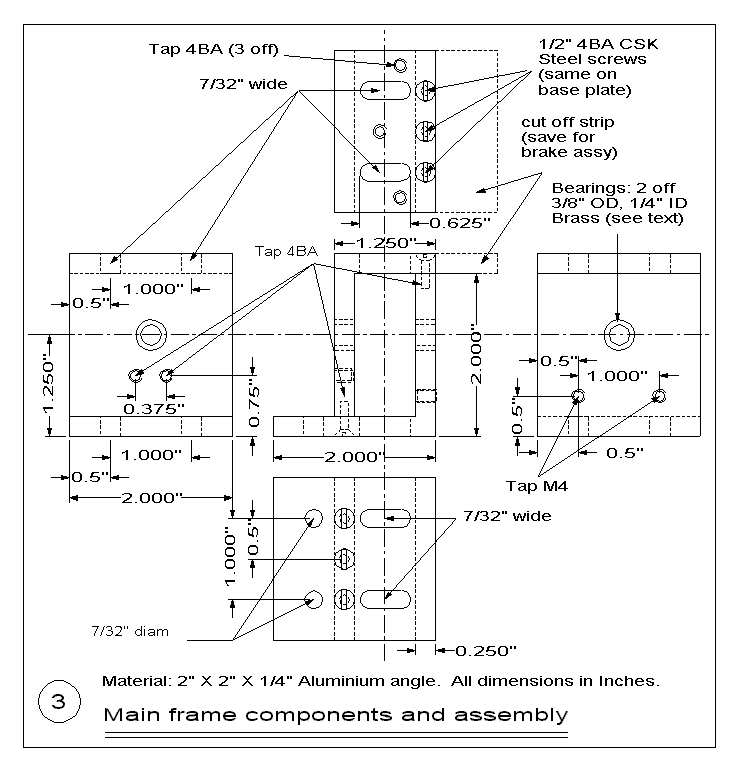
Mount the frame in the four-jaw chuck (or on the faceplate if preferred) and take a light facing cut to true up the sawn ends of the frame components. Mark out the final 2" length of the frame from the trued end, return it to the lathe and finish to length.
Drill the bottom plate for the T-bolt holes and slots, using a 7/32" diameter drill. Finish the slots by filing. This arrangement of mounting holes/slots will allow the head to be mounted on the cross-slide either on the same axis as the lathe spindle or transversely. The two slots allow some adjustment of the bolt positions when the head is mounted transversely. The T-bolts should be " long, preferably hex socket head bolts, with square nuts to fit the T-slots. The standard T-bolts used on the Taig are UNF 10-32, but 3/16 Whitworth is a usable alternative. Drill/file matching slots in the top plate to admit the Allen key.
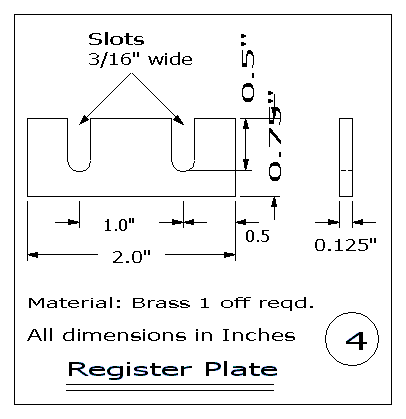
Cut a 2" length of 3/4" X 1/8" brass strip for the register plate, shown in Figure 4. Form the slots by drilling two 3/16" holes 1/2" in from each end, on the midline of the strip, followed by hacksaw/file to the edge to finish. Drill and tap the two holes in the backplate to take the M4 mounting/adjusting screws and fit the register plate to the frame, with its lower edge projecting about 1/8" below the lower surface of the base plate.
Scribe a vertical midline on the frontplate to act as a guide line for drilling the holes for the bearing inserts. Fit the frame to the cross-slide with the output shaft axis parallel to the lathe bed, sliding it towards the headstock before tightening the T-bolts to ensure that the register plate makes proper contact with the right-hand edge of the cross slide. Fit a drill chuck to the lathe headstock and fit a No.1 centre drill in the chuck. Adjust the cross-slide so that the centre drill will split the scribed line, then lock the cross-slide and centre drill the front plate. Follow this by step-drilling through both front and back plates, to a final diameter of 0.375". Remove the main frame from the cross slide and turn two brass inserts " thick and nominally 0.375" diameter; these should be a good press-fit in the front and back plates and will form the output shaft bearings. Clearly, Oilite bushes, bored to 9/32", could be used for this purpose, and in fact on my first attempt I did just that. I was unhappy about the fit of the shaft in these bearings, owing to a little over-enthusiastic turning on its bearing surfaces, so I removed the original bushes and replaced them as described. The result has proved quite satisfactory, and is considerably cheaper, particularly if you haven't destroyed 2 perfectly good Oilite bushes in the process! Fit the inserts to the frame, return the frame to the cross slide and repeat the step-drilling operation, to a final diameter of 9/32".
The front plate is not drilled and tapped for the brake shoe mounting screws until after the output shaft and brake shoe have been constructed.
Figure 5 shows the output shaft, and in dotted outline, the original form of the 1MT drill chuck arbor from which it is derived. It is, of course, possible to make this part the hard way, turning it down from suitable stock, say " mild steel, but the approach adopted here was chosen because it removed the problem of cutting an accurate 3/8"-24 thread, a tricky operation on a lathe that has no screwcutting facilities! Other approaches, for example using a 3/8"-24 die to cut the thread, were considered and rapidly discarded on grounds of the difficulty involved in maintaining any reasonable degree of concentricity between the resultant thread and the remainder of the shaft.
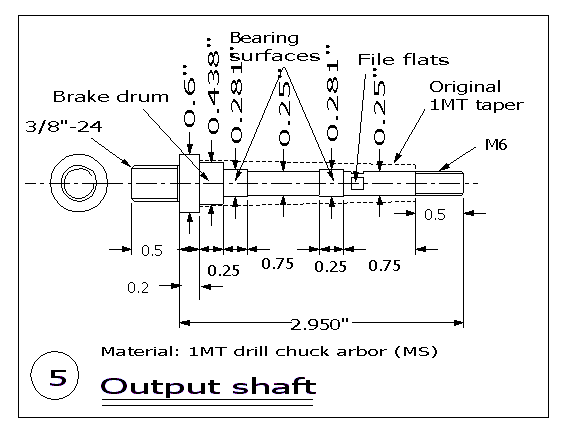
Turning the shaft is a simple matter of mounting it "between centres"; the "free" arbor was ready centre-drilled at both ends, so this was no problem to set up. The turning is otherwise straightforward, as follows:
Turn down the thick end of the MT1 taper to form the brake drum, 7/16" diameter. The length of the brake drum section, nominally 1/4", should be left marginally in excess of the thickness of the "brake shoe" material to avoid the thrust bearing being formed on the front face of the brake shoe. Turn down the remaining length of the taper, nominally to 9/32" diameter; I chose to reduce the shaft diameter slightly between the two bearing surfaces to ease assembly, but this is not essential. Reduce the diameter of the shaft beyond the rear bearing surface to 1/4", to carry the wormwheel. The final 1/2" or so of the shaft is further reduced and threaded 6mm to take the locknuts that will hold the wormwheel in place. The two bearing surfaces and brake drum should be reasonably well finished; a final polish with a burnisher would be ideal. The aim should be to obtain a shake-free running fit in both bearings; if in doubt, err on the tight side, as the bearings will inevitably bed in to some extent in use.
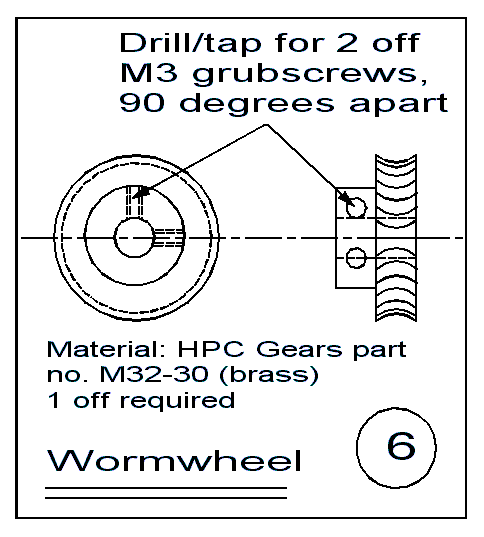
The wormwheel, shown in Figure 6, is a standard part available from HPC in the UK; no doubt there are similar wormwheels available from US suppliers. The wormwheel is 32 DP, 30 teeth, part number M32-30, in Brass, and takes the corresponding steel single-start worm, HPC part number W32-1. (HPC also manufacture these parts in plastic at a lower cost. As the worm drive in this design is not required to take any significant load, I see no reason why the plastic versions should not be used, but I have no experience of using them.) The worm and wormwheel are already bored for 1/4" shafts; the boss of the wormwheel should be drilled and tapped M3 to take a pair of grub screws, positioned 90 degrees apart. A pair of flats are filed on the output shaft to match the position of the grub screws. The worm comes ready drilled/tapped for an M3 grub screw. HPC appear to be happy to provide small orders for the amateur market; their address is given at the end of the article.
Readers who feel the need for extra rigidity in the output shaft may choose to increase the shaft dimensions accordingly, along with corresponding alterations to the dimensions of the brake shoe/drum and the bearings in the front and back plates. The main limitation here (apart from the dimensions of the MT1 arbor) is that a reasonable shoulder is required between the front bearing and the brake drum, to form a thrust bearing.
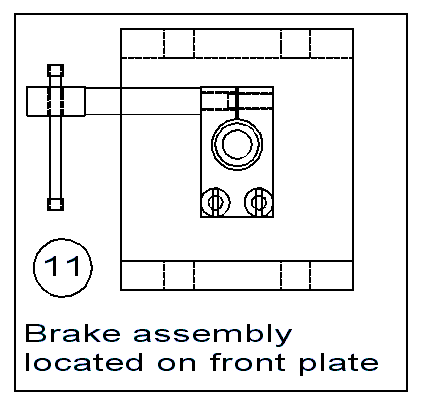
Figures 7-10 show the components of the brake assembly, and Figure 11 shows the completed assembly fitted in place on the front plate of the main frame.
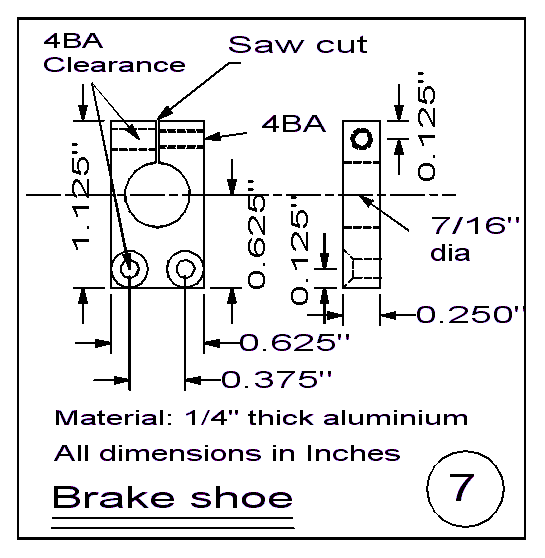
The brake shoe, Figure 7, is fabricated from 1/4" thick aluminium; if it has been removed with sufficient care, the off-cut from forming the top plate of the main frame will suit very well. Cut and file the off-cut to size, 0.625" X 1.125", to form the brake shoe. Mark the position of the 7/16" hole and step-drill to the final diameter. It is necessary for this hole to be a reasonably snug fit on the brake drum section of the output shaft, so it is worth experimenting on a piece of scrap to determine whether your 7/16" drill will cut accurately enough; if not, make the final cut with a reamer.
Mark, drill and countersink the two holes to take the 4BA mounting screws. The countersinking should be deep enough to sink the 4BA screw heads flush with the surface. Clamp the brake shoe in position on the front plate, as shown in the assembly diagram, Figure 11, with the output shaft inserted through the shoe and both bearings to ensure accurate positioning. Spot through the countersunk holes to mark the front plate. Disassemble, drill the two holes in the front plate and tap 4BA.
Cross-drill the brake shoe for the clamping bolt using a 4BA tapping drill, then carefully hacksaw along the mid-line as shown in the drawing, bisecting the hole just drilled. Open out the left-hand hole to 4BA clearance, tap the right-hand hole 4BA. Fit the finished shoe to the front plate with 4BA CSK steel screws.
Re-fit the shaft, fit the worm wheel to the threaded end of the shaft, boss inwards, with a thin steel washer between boss and backplate. Oil the bearings. Screw the wormwheel grub screws in until they just register with the flats on the shaft (but do not tighten them yet), fit a 6mm nut on the end of the shaft and use it to adjust for zero end-float while still allowing the shaft to turn (a little stiffness in the bearings is not a problem), tighten the grub screws and finally lock with a second 6mm nut.
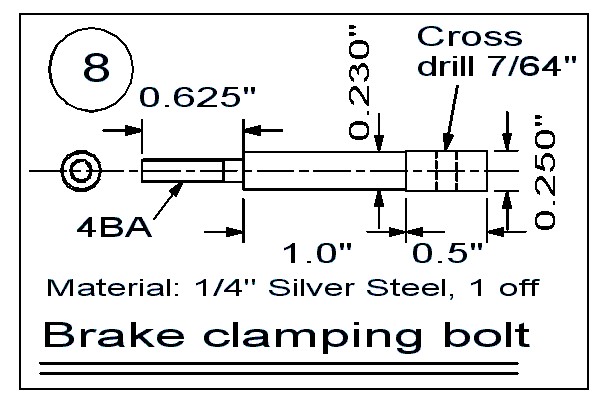
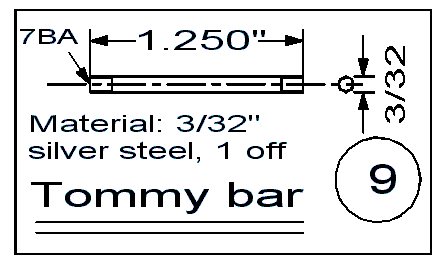
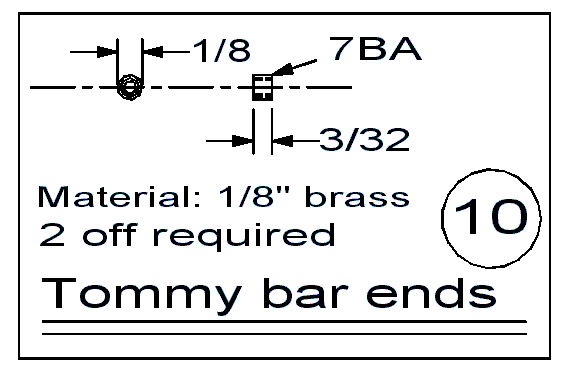
The brake clamping bolt, Figure 8, is fabricated from a length of 1/4" silver steel rod. Reduce the diameter of the last 5/8" to 0.14" diameter and cut a 4BA thread for at least half of the length. The next inch of the bolt is also reduced in diameter, this time to 0.23", to avoid contact with the front plate when the clamping bolt is fitted in position. Cut the bolt to a finished length of 2.125", and cross-drill 7/64" to take the Tommy bar. The Tommy bar, Figure 9, is simply a 1" length of 3/32" silver steel rod, threaded both ends 7BA (I discovered that 3/32" rod happens to take a 7BA die very nicely!). The two end nuts, Figure 10, are constructed from 1/8" brass rod, 3/32" long, drilled axially and tapped 7BA. The Tommy bar is passed through the cross-drilled hole in the clamping bolt, the brass nuts are then screwed in place, using Locktite if so desired. The clamping bolt assembly may then be screwed into the brake shoe and its action tested; a half-turn or so of the clamping bolt in either direction should be sufficient to lock/unlock the output shaft.
Figures 12-15 show the components of the worm carrier and its associated mounting brackets. The worm carrier body, Figure 12, is machined from " Aluminium bar; cut a length of bar to allow finishing to 2.625", face one end in the lathe, reverse and face the other end to length. Centre punch on one end the centre of the hole for the shaft bearing; this should be " from one edge and 3/8" from the adjacent edges. Return the bar to the 4-jaw chuck and adjust so that the centre punch lines up with the tailstock centre (assuming that the tailstock is accurately in line with the headstock). Turn the last 5/8" of the bar to " diameter. At the same setting, step drill the entire length of the bar to 0.375" diameter using the tailstock drill chuck. This requires some care and patience to avoid the drill wandering off line, but there is sufficient adjustment available in the positioning of the mounting brackets to cope with some inaccuracy here.
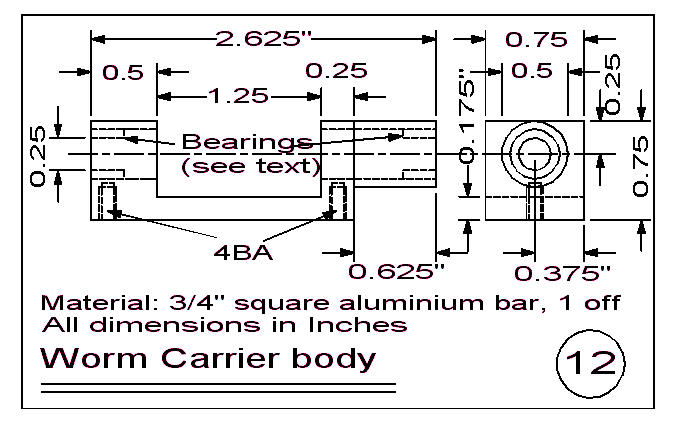
The next operation involves removing a considerable amount of material from the mid-section of the carrier to make a channel for the worm. This is most easily done using the milling attachment (vertical slide) or a dedicated milling machine, but is a simple (if energetic) job with hacksaw and file. The channel should be finished to the length of the worm, nominally 1" long, starting " from the square end of the bar. The drawing shows the channel depth as 0.575", which gives ample clearance for the worm.
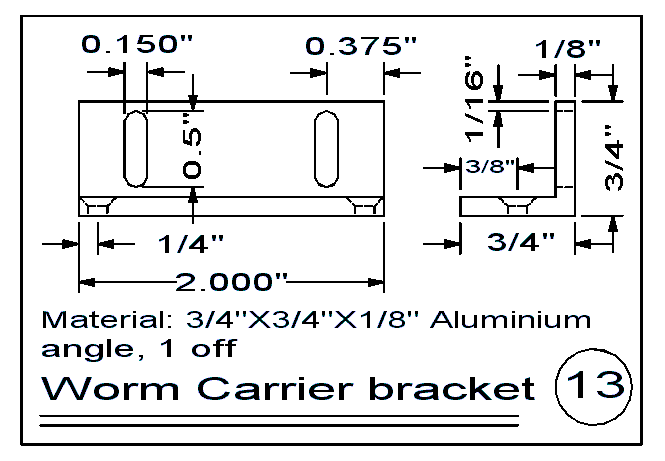
The worm carrier bracket, Figure 13, is constructed from a 2" length of "X"X1/8" aluminium angle. Two holes are drilled and countersunk for 4BA CSK screws on one face; these holes are used to mark the positions of the 4BA screw holes on the worm carrier body, which are then drilled and tapped. Two slots are cut in the other face of the bracket, as shown in Figure 5. The slots will carry 4BA screws/washers which screw into the corresponding holes in the main frame bracket. Assemble worm carrier body and worm carrier bracket using two 4BA CSK screws, as shown in Figure 16.
The bearings used in the prototype were Oilite bearings, " long, " inside diameter, 0.375" outside diameter, supplied by HPC Gears, part number QT 172-1. Insert the bearings into the two ends of the worm carrier body; they should be a push fit. If necessary, use the proverbial Locktite. As with the main spindle bearings, there is no good reason why these bearings cannot be fabricated from suitable diameter brass rod if so desired.
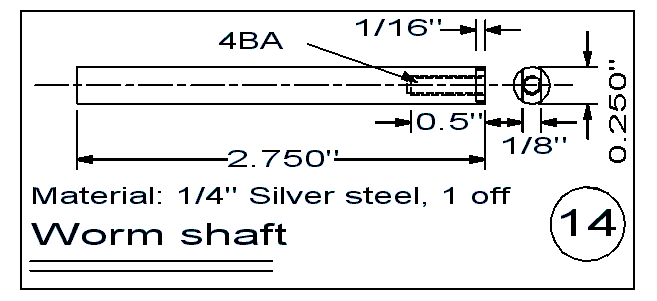
The worm shaft, Figure 14, is a 2" length of silver steel rod; face one end and lightly chamber the edge, reverse it in the lathe, cut to length. Centre drill the end with a No. 1 centre drill, then drill into the end for half an inch with a 4BA tapping drill, tap the hole 4BA. Two flats need to be filed on the tapped end of the shaft, as shown in Figure 5, to allow the slot in the indexing arm to engage with the end of the shaft. The length of the flat is shown as 1/16", but the primary requirement is that it does not exceed the thickness of the indexing arm.
The worm and its shaft can now be assembled in the carrier, as shown in Figure 16. A flat can be filed at a suitable position on the worm shaft to take the grub screw. Any end-float in the worm shaft is dealt with by withdrawing the shaft far enough to insert washers of shim material between the end of the worm and the carrier and re-assembling.
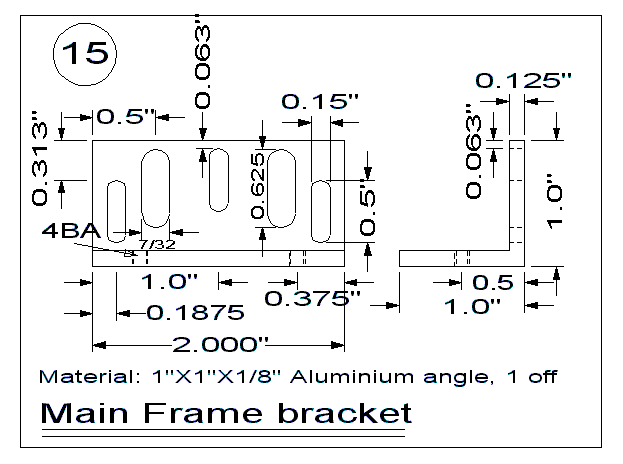
The main frame bracket is a 2" length of 1"X1"X1/8" aluminium angle; 5 slots are cut in one face, as shown in Figure 15. The larger of these slots match those on the top plate of the main frame; the three remaining slots carry 4BA screws/washers which screw into the corresponding holes shown on the top plate. The bracket can be used as a marking guide for the screw holes on the top plate, which are then drilled and tapped 4BA. Temporarily fit the bracket to the top plate with 4BA screws. Two holes are drilled and tapped 4BA on the other face of the bracket. Use the slots in the worm carrier assembly as a marking guide; this also allows a check to be made on the engagement of worm and wormwheel, and any necessary adjustment made by altering the position of the holes before drilling.
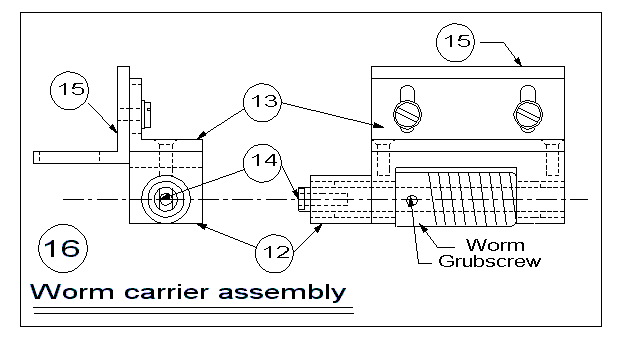
The worm carrier and brackets can now be assembled with the main frame and adjusted to their final positions; the aim should be to position the brackets for minimum backlash in the worm drive, and of course to ensure that worm and wormwheel are properly aligned.
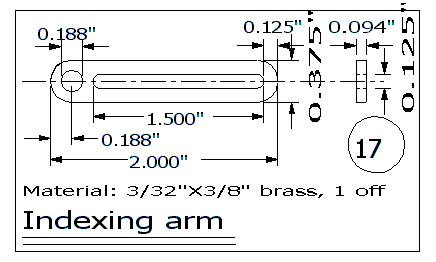
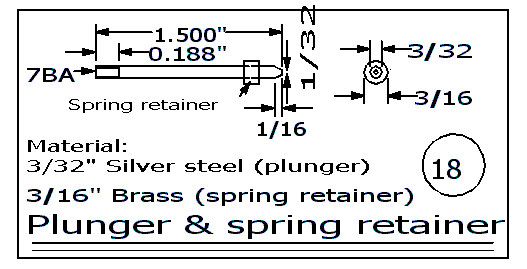
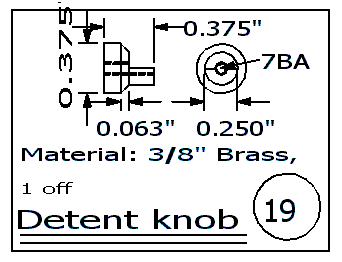
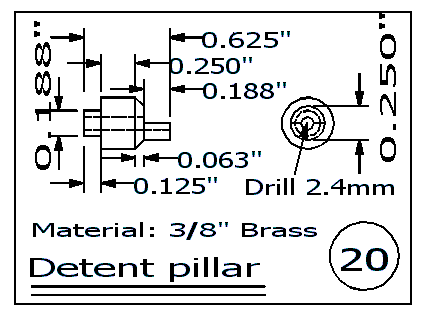
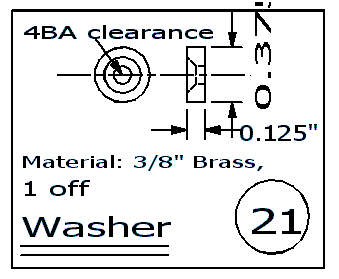
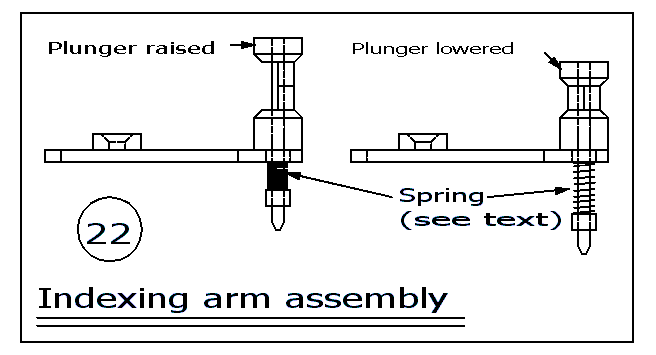
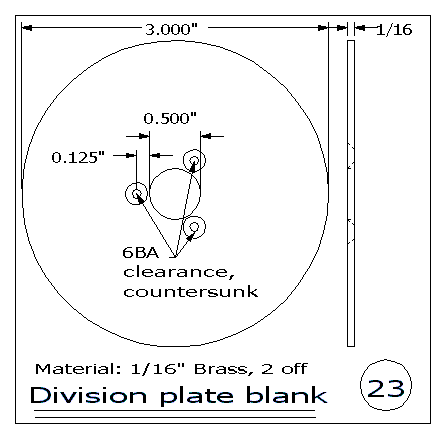
The indexing arm and detent is constructed from the components shown in Figures 17-21; Figure 22 shows the assembled arm and plunger.
